
Customize your own truck
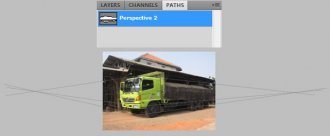
Step 2: Drawing Perspective Lines
Activate Paths panels and click Create new path icon to make new path. Use Line tool to draw perspective line by following the cars shape. In the end, you will end up with a two-point perspective. Psdtuts+ has already published a very complete tutorial on drawing perspective. I found out that the best tutorial is How to Draw with Perspective from Gavin L. The technique used here is similar to Step 39-44 in the tutorial.
Below you can see the detail. You can see that we can just simply following some straight lines on the truck.
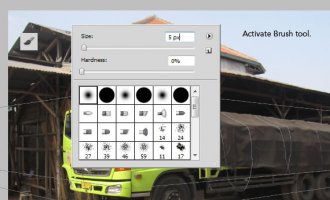
Step 3
We are going to render the perspective path into a line. First, we need to set the Brush property. Activate Brush tool (B), right click and set its brush size to 5 px with 0% Hardness.
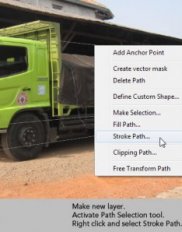
Step 4
Make new layer. Activate Path Selection tool, right click on the canvas and select Stroke Path. In the next dialog box, select Brush.
Step 5
Below is the perspective I used in this project.
Step 6: Background
 Before moving on, let's work on its background. Make new layer and draw a radial gradient from white to gray.
Step 7
Duplicate background by pressing Ctrl/Cmd + J. Perform transformation (Ctrl/Cmd + T). Pull transformation handle down until we have a nice floor.
Step 8
Activate Eraser tool. Select big brush size and set its hardness to 0%. Erase top part of the floor.
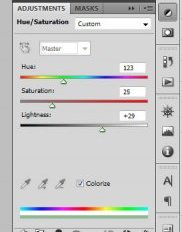
Step 9
Add Adjustment Layer Hue/Saturation with following settings. This Adjustment Layer will add a nice green color onto the background.
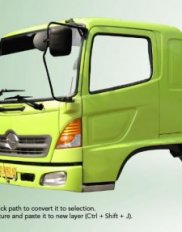
Step 10: Cutting The Truck
Select truck head using pen tool.
Step 11
Convert path into selection by pressing Ctrl/Cmd + Enter. Hit Ctrl/Cmd + J to put selection into new layer.
Step 12: Bumper
Let's start drawing its bumper. First, we need the perspective line to guide our drawing. Place the line on top of the canvas. Following this guide, draw bumper basic shape. No need to worry about shading or highlight. The first important thing is to match its perspective.
 After complete working on the perspective, then start painting its highlight. Add new layer. Activate Brush tool with low Opacity setting. Paint white for its highlight and black for its shadow.
Step 13
Let's hide the new bumper for now by clicking on its eye icon in Layers panel. Select original bumper and then hit Ctrl/Cmd + J to duplicate it to a new layer.
Step 14
Bring the new bumper back by clicking its eye icon again. Place the duplicated bumper on top of the new bumper. You may need to erase its edge until it blends with the new bumper using a soft Eraser tool.
Step 15
Make new layer and place it on top of the bumper. Activate Clone Stamp tool. Set sample source to All Layers. Alt-click area similar to the new bumper as clone source and then click on the license plate to cover it. Do this carefully. You may need to use lots of clone source to avoid repeating pattern and get natural result.
 Step 16
Activate brush tool and set its Opacity to 20-35%. Set foreground color to white and draw some highlights on lower part of the bumper.
Step 17: Intercooler
Let's draw a hole for intercooler inside the bumper. Make new path and then draw a rounded rectangle path on the bumper. Make sure to keep an eye on its perspective. Hit Ctrl + Enter to convert the path into a selection and then fill it with black. Using a soft brush with small Opacity, draw some soft and subtle shadows on left and lower sides of the intercooler. See picture below for reference.
Step 18: Side Body Kit
Draw more perspective line to help you draw its side body. I find it convenient to draw using pen tool. It helps to draw precisely. And, if you mess up all you need to do is modify each point using Direct Selection tool.
Step 19
Convert path into selection and then fill it with #8dab3c.
Step 20
Make new layer on top of the side body kit. Activate brush tool with low Opacity. Hit D to set foreground and background color to default, black and white. Hit X to exchange these two colors. Paint white to draw highlight on top of the side body kit and black to draw shadow on lower part of the side body kit.
Step 21
Extend the side body kit. Paint another highlight and shadow on top of it.
Step 22
Draw a small polygonal selection on fender and fill it with white.
Step 23: Tire and Rim
Draw an elliptical shape for its tire.
Step 24
Alt-drag the shape to duplicate it. Place the tire under rear fender.
Step 25
Use pen tool to simply draw a polygonal shape for tire sides.
Step 26
Draw a white elliptical shape. Add layer Style Gradient Overlay.
Step 27
Draw two overlapping ellipses with color #a19b94. Set path mode to Add and Subtract. Add Layer Style Gradient Overlay with following settings.

Share this article
Related Posts

Latest Posts


