
3D car Modeling
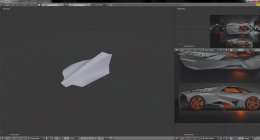
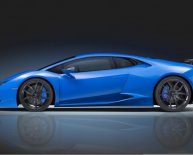
 My name is Ettienne Vorster and I’m the designer behind the Lamborghini Egoista 3D Model made with Blender 3D. I’ve been modeling cars for the past two years and the Lamborghini Egoista was the first car that had me in my toes till the end of its development process. Exclusively built for the awesome folks here at Sketchfab. In this guide I’ll be showing you guys how this car went from one vertex, to the final car seen below. Lets get started!
Reference images
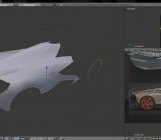
Before we can start building this absolutely crazy looking Lamborghini, I had to go on a mission to find as much of this car as possible. Anything I could get my hands on, images, videos you name it. Luckily, Lamborghini was kind enough to give us some images that would work as a rough blueprint for the car. However these images weren’t efficient enough to rely 100% on.
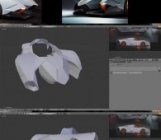
Here is some of the images that Google could gave me, these were images found on almost any website that featured this awesomely absurd looking car.
Between all of these images there were 4 images that would help in getting down the first part of the car. The top, front, rear and side photos of this car would help me in creating a rough blueprint for the car, however we cannot rely on these images too much as they weren’t completely orthographic.
After getting the images, I wanted to make a “blueprint”, so assembling the images in Adobe Photoshop in the below layout.
Now that we had a rough estimated blueprint, we could start building the car.
 Building the Lamborghini Egoista
Using this image, I set it up in Blender 3D as a background image. After this, I had to start poly modeling. I added the first plane in top view and started to trace the outline of the middle body plate and roughly adjusting the vertices to shape the first part of the car. Through the whole process of modeling the car the body was adjusted and improved upon.
Getting a starting point on the car was difficult, but after I made the first part, the rest of the car became easier to model, as this first body part was used as an anchor point for scale and reference for the rest of the car. Now that we had the first part, we needed to design parts that would fit exactly with this body plate’s edges. The best way to do that was to copy this body part’s vertices and use them as the edges of our next body part.
A key thing to remember when building cars, it is easier to build every car body part separate, this makes managing the overall model later much easier, and if you make a mistake you don’t have to rebuild the whole car, only the part that you made a mistake on. Using modifiers like mirror modifiers, helps to get an overall feel of how wide the car is an how it would look when it’s finished.
In the image above, using the makeshift blueprints I’ve built the second body part, as well as specifying where my wheel arches will be. Doing this gave me a better idea of scale. The wire wheel arches would later also serve a purpose for creating the other body parts. Mostly working in the side and top view, I’ve managed to build the side body plate of the car.
A good way to make sure you’re on the right track is to constantly refer to the real world car or object you’re building, take special attention to edges that change the general shape of the object you’re building. Look at how light falls on the car, this would give you a good idea in which direction and by how much an edge stands out and try to see the model in your head.
Off to build the next part of the car, here I copied two of the body plates to get the link between them and the body part I needed to model. Another habbit that helps a lot is to create loop cuts and edge doubles to see the car edges and to know where you stand with the car’s progress.
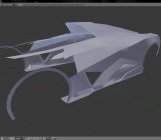
Now that I have a proper part of the car, it was time to look at designing the shape for the Lamborghini Egoista’s Rear wing. For this we need to look at photos of where the wing is out and where it is when the car is idling. Using Google and reference images, I took a look at the wing from every possible angle to get an idea of how the wing was shaped and copying this exact shape onto the car. Using the built pieces, I model the wing in its rest position and just move it up to get an idea of how it overall looks like.
Now that we have most of the car’s rear done, it was time to move to the front, using the same methods to build all the other body parts, I build the hood and the overhead for the front wheel arch. Using the wheel arch also as a reference to know how long the nose of the car should be.
Now that we have an anchor for the front of the car, things would make it a bit easier, though building the car’s front turned out to be more difficult than most of the car so far. For this I did more research on the car’s front. Where were vents located, how far down the actual body is before it reaches the front spoiler, what is the angle of the body, how far is it in etc. Building the nose of the car was the final part before moving over to building the carbon spoilers at the bottom of the car. At this point the top view of our blueprint became redundant as the car’s shape did not allow for any shape recognition for the part we needed to build.
Now that we had the front of the car built we needed some rims. Building the car’s rims off of the low quality side view and a ton of other reference images, the images gave me a good idea on how to build the rim. After I built the rim it was then given some color. Paying attention to what colors that were used on the real world rim, and what color was reflecting from the rim was important to get the rim to the finished Lamborghini look. The carbon fiber fins were built the same as all the Lamborghini’s body parts so far.
Building the Egoista Rim & adding color
The model was then saved and imported into the Lamborghini Egoista file and positioned correctly onto the car. Together with the car, I made a simple cylinder and unwrapped either sides of the tire and made two new textures for it. These were only normal maps, one for the tire tread, and the other for the Pirelli tire sidewall. Now that it was added, it was a good time to start giving the car some color to accompany the newly created rims.
Building the rest of the Egoista
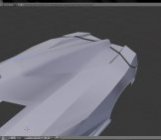
Now it’s starting to look like something. At this point the car’s body plates had some minor fine tuning, like getting rid of small surface anomalies, like bumps etc. Also adding edge doubles to get an idea of how the overall model looks like so far. Now that the majority of the car was built, it was time to finish the car’s rear. Luckily for this part, there wasn’t a lot on the rear to model, as most of the car’s rear existed out of a carbon skeleton.
Systematically building all the shapes I used reference images and our rough blueprint to get an idea where to place all the floating pieces. With the biggest body parts floating in the right areas, getting the overall scale and proportions of the car’s rear became a lot easier. After the models were made I went ahead and colored them according to the images I had. However, the colors were later changed as the concept art and the actual car looked a tiny bit different from each other.
Now that the rear was mostly in shape, things like, engine details needed to be added to the car, and also a place for the brake lights, vents, and the Lamborghini logo. These were all positioned in the nicely specified area of the shapes that were designed earlier. At this point the blueprint made initially became redundant, and referring to images of the car at an angle became extremely important.
Share this article
Related Posts
Latest Posts


